
Ever wonder why some monitor stands wobble while others stay firm? Setting up your monitor can seem as tough as solving a puzzle with too many pieces.
In this guide, we show you easy steps to make your monitor safe and steady. First, check the VESA pattern (the set of holes on the back) to ensure it matches your stand. Next, tighten the screws until the mount feels firm.
These steps work just like fitting a key into its lock. Follow along, and you’ll have a reliable, steady setup in no time.
Step-by-Step Monitor Stand Installation Guide
-
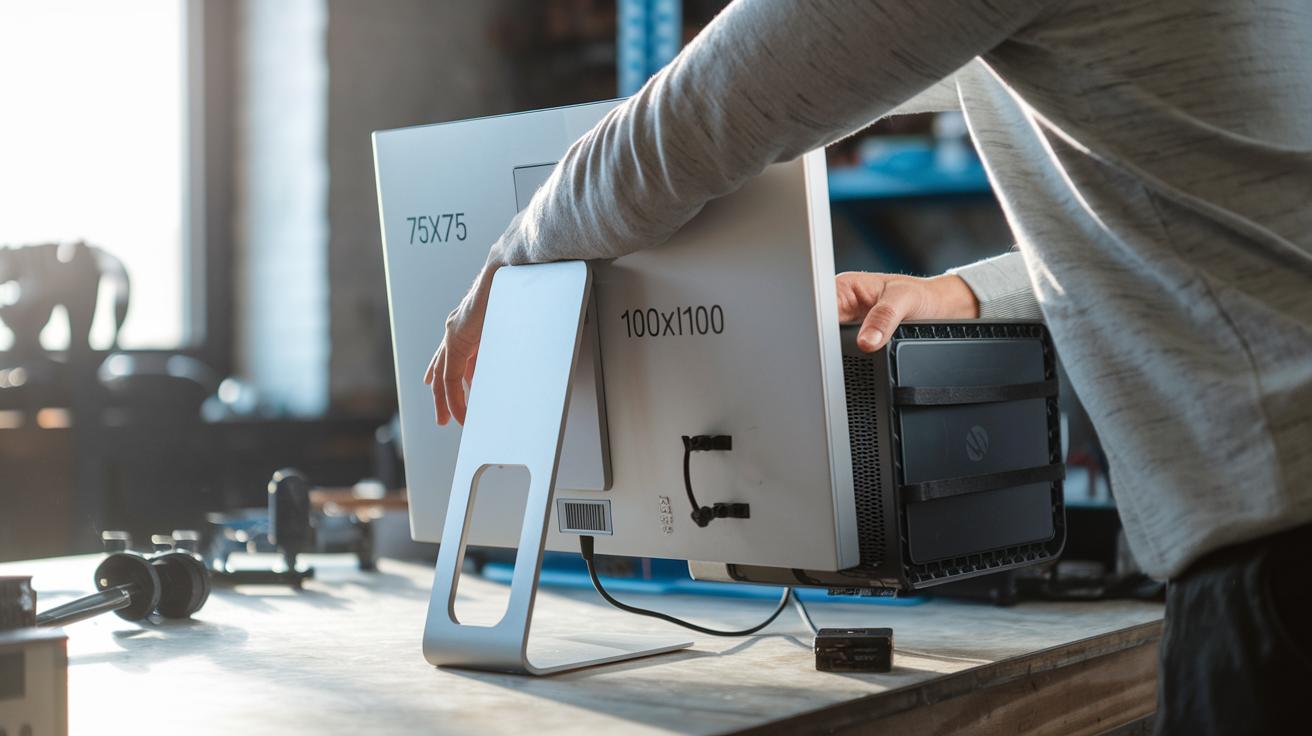
Start by checking your monitor's VESA pattern. It should be either 75×75 mm or 100×100 mm. Align the back of your monitor with the stand arm like fitting a key into its lock, everything should line up neatly.
-
Next, secure the stand by tightening four screws around the VESA holes. Use the screws that came with your monitor or stand. A firm screw connection stops any wobble, much like fitting a puzzle piece perfectly.
-
To attach a mini PC mount, line up the mini PC’s mounting holes with the monitor’s VESA pattern. Thread the straps through the designated holes and secure the mini PC with the velcro straps provided. Think of it as wrapping a gift, your device should sit securely and level.
-
For a vertical monitor setup, install the rotational VESA plate using a 1/4″ bolt with a black washer. Then, fasten it with a lock nut. This setup lets you switch between portrait and landscape modes with a full 360° turn, similar to a safety latch preventing a door from swinging open unexpectedly.
-
Finally, have a helper hold the monitor while you secure and adjust it. This extra hand reduces the risk of damage and ensures everything lines up correctly.
Clear instructions and a video guide can make the installation process smooth and reliable.
Monitor Stand Assembly Essentials: Tools and Preparation

Before you start setting up your monitor stand, make sure you have all the right tools. Grab a sturdy screwdriver set, strong drill bits, a bubble level (a tool that shows if a surface is even), and a stud finder (a tool to spot strong wall supports). These items help prevent stripped screws and unwanted damage. For example, using your level is a bit like hanging a picture – every angle counts.
Check your desk for stability. If your desk is thin, consider adding a support board to spread the load and avoid bending. Safety matters too. Keep a simple fall-protection system handy. This system should include an anchor, a harness, and a connector to lower the risk of accidents while you work.
Getting everything ready is like setting up a workbench. It speeds up the process and cuts down mistakes.
- Sturdy screwdriver set
- Strong drill bits
- Bubble level
- Stud finder
Take a moment to verify that your workspace is stable and your tools are compatible. With proper preparation, your installation will be safe and smooth.
VESA Compatibility and Monitor Stand Specifications

When you set up your monitor, start by checking its VESA pattern (the holes on the back). Most monitors come with a 75×75 mm or 100×100 mm layout. If your monitor shows a 75×75 mm pattern, make sure the stand fits that design.
Also, confirm that the stand can hold more weight than your monitor. For instance, a mount rated for 20 lbs works well if your screen weighs about 10 lbs. Make sure the bracket fits snugly with no wiggle room. Check that all parts line up correctly, as any gaps could cause the setup to shift during use.
Desk Mount vs Wall Mount Monitor Stand Installation

Desk mounts help keep your workspace neat and flexible. They clip onto your desk, but it's key to make sure the clamp grabs a solid edge. For thinner desks, use a support board to stop bending over time. Tighten your screws until they're snug but not too tight to damage the desk. It’s like using a binder clip that holds your papers firmly without crushing them.
Wall mounts keep your desk clear by holding the monitor on the wall. They need a bit more care during setup. First, use a stud finder to locate the support beams in walls, whether it's drywall, concrete, or brick. Next, pick anchors and bolts that suit your wall type. Measure and level carefully, every tiny bit counts, just like hanging a picture so it looks balanced.
Both options need you to check for stability:
- For desk mounts, confirm your desk is strong and add a support board if needed.
- For wall mounts, use hardware that fits your wall type and ensure anchors are secure.
Before you hang your monitor, test the setup to catch any issues early. Your choice will come down to your workspace layout and what makes you feel most comfortable with a safe, sturdy installation.
Monitor Stand Setup: Cable Management and Ergonomic Positioning

Keep your cables neat by bundling them with cable ties. Thread your wires along the monitor arm or behind the wall. Make a small loop (a service loop) at the connection point so you can adjust the cables later without any hassle. Think of it like wrapping a tidy package that's easy to open if you need to change a cable.
Set your monitor 50 to 100 centimeters away from your eyes. This distance helps you see the whole screen without straining. Make sure the top third of the screen is at eye level to reduce neck and shoulder tension. A tilt of 10 to 20 degrees cuts down on glare and gives you a comfortable view.
Adjust your chair so your feet rest flat on the floor. Set the armrests to support your upper arms without forcing your shoulders to hunch. Position your keyboard so that your elbows stay close to your body. These simple changes create an ergonomic setup that eases eye, neck, and hand fatigue, making long work sessions more comfortable.
- Use cable ties to keep wires together.
- Thread cables neatly through the monitor arm or behind the wall.
- Create a small service loop near connection points for easy adjustments.
Troubleshooting Common Monitor Stand Installation Issues

If your monitor feels wobbly, start by checking every clamp and screw. Loose screws can cause the stand to be unstable. Grab your screwdriver and check each connection until the monitor sits firm. Be careful not to over-tighten, as that might harm your desk or wall.
If your screen looks tilted, that misalignment can throw off your view and stress the monitor. Use a level (a simple tool to check if something is straight) to see if the monitor is even. If it's off, loosen the screws just enough to adjust it, then tighten them again. Think of it like hanging a picture; small tweaks can make a big difference.
Sometimes, a weight mismatch might be the culprit. Make sure the mount can handle more than your monitor's weight. For example, if the mount is rated for 20 lb, it should easily support a monitor weighing 10 lb. If the monitor feels too heavy for the stand, checking the weight limits might reveal the issue.
After making adjustments, give the monitor a gentle push to test stability. If it shifts, you might need to tighten things up a bit more. This simple test helps you be sure that your setup will stay secure for a long time.
- Tighten all screws and clamps
- Use a level to fix any tilt
- Verify the mount’s weight capacity and test stability
Monitor Stand Maintenance: Ensuring Longevity and Stability

Keep your monitor stand safe by checking it on a regular basis. Every few months, look over all the screws and clamps to make sure nothing is loose. This simple check helps you catch problems early. Wipe the mounting parts to clear away dust and dirt that can affect how the fasteners hold. Tighten the screws as needed, just like you would on a bike before a long ride.
Write down the installation date and any warranty details. This note helps you remember when to do your next check and can be useful if you need help or replacements later. Giving the stand a quick stability test every now and then makes sure it stays secure over time.
- Check screws every few months
- Clean the mounting parts regularly
- Tighten loose fasteners
- Record installation dates and warranty info
Final Words
In the action, we walked through the complete monitor stand installation guide, from setting up your tool kit and ensuring VESA compatibility to securing your monitor and managing cables. We shared clear steps for both desk and wall mounts, along with practical fixes for common issues.
Building on monitor stand installation tips, we showed how to keep your setup stable year after year with regular checks. Simple, tested steps like these help create a reliable workspace. Enjoy your improved setup and work confidently with your new monitor stand.
FAQ
Q: What are the best dual monitor stand installation and desk mount setup tips?
A: Dual monitor stand installation tips focus on aligning monitors with the correct VESA holes, using all recommended hardware, and enlisting help when lifting and aligning. This leads to a stable dual setup.
Q: What are some DIY-friendly monitor stand installation tips?
A: DIY monitor stand installation tips include gathering a quality screwdriver, drill, level, and study the guide. These tools help ensure a precise setup with proper support and safety precautions in place.
Q: What monitor stand installation tips should I follow when buying from Amazon?
A: Installation tips for Amazon stands stress reading customer reviews, checking for detailed instructions or video aids, and confirming that the stand’s hardware and VESA pattern match your monitor’s specifications.
Q: How can I mount a computer monitor without drilling holes?
A: Mounting a monitor without holes usually involves using clamping or adhesive-based mounts. These options secure your monitor safely to the desk without damaging the surface.
Q: What are Inland Counterbalance Monitor Arm installation instructions and placement tips?
A: Inland Counterbalance Monitor Arm instructions advise a careful review of the manual, precise alignment of the VESA rotational plate with a 1/4″ bolt and lock nut, and strategically placing the arm for optimal stability.